Image Mode Guide
Image Agent
When you select Image Mode, we enable Image Agent by default to assist with image generation. With Image Agent enabled, you only need to enter a brief prompt, and the Agent will automatically incorporate web-sourced information and contextual cues to supplement references and refine the visual direction — helping you generate more consistent and complete images.
Advantages of Image Agent
-
Web-Enhanced Context: Results are more aligned with the latest trends, trending topics, and real-world references, reducing hallucinations
-
More Professional & Refined Visuals: Improved composition, texture, and detail for a more polished output
-
Complex Images from Simple Prompts: Quickly turn rough ideas into usable visuals
-
Less Trial and Error: Lowers the prompt-writing barrier, making the creative process smoother
With Image Agent, the image generation experience becomes lighter and faster. If you’d like to learn how to write better prompts yourself for even higher-quality results, join our Discord for more tutorials and community discussions.
Interface Guide
Entering Image Mode
- Select Image Mode: Click the second button at the bottom left of the prompt input field to enter image generation mode
- Choose Model and Edit Parameters: Select your desired model (e.g., Nano Banana 2) from the dropdown menu if it is not already selected, edit your parameters to match your needs, and then send your prompt
Control Panel Button Guide
Referencing Canvas View
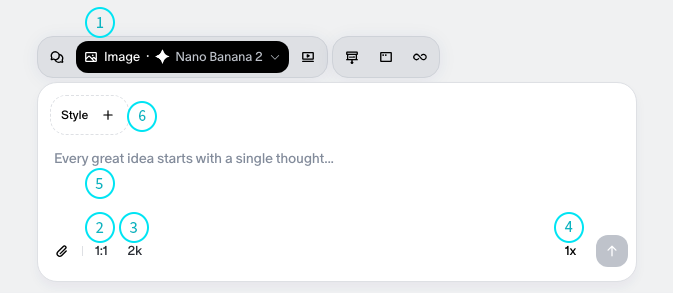
Once inside the canvas, you will see the floating input bar. Below is a description of each button’s function:
Mode & Model Selector
- Position: Top left
- Function: Switch generation mode and select a model
- Action: Click the menu on the left (e.g., “Image”), and select Nano Banana 2 or another model you wish to use from the list to activate the corresponding generation engine.
Aspect Ratio
- Position: Bottom left button (e.g.,
1:1) - Function: Set the aspect ratio of the generated image
- Action: Click to toggle between different ratios — Square
1:1, Landscape16:9, Portrait9:16.
Resolution
- Position: Second bottom left button (e.g.,
1k) - Function: Set the quality detail
- Action: Toggle between Standard
1kand High Resolution.
Quantity
- Position: Bottom right button (e.g.,
x1) - Function: Define how many images to generate at once
- Action: Click to choose how many images to generate per batch (e.g., x1, x2, x4).
Prompt Input
- Position: Center of the floating input bar
- Function: Enter the text description for image generation
- Action: Type your prompt where it says “Start a new topic” to begin generating.
Attachment Upload
- Position: Bottom-left corner of the floating input bar
- Function: Upload and insert reference images into the prompt
- Action: Click the attachment upload button at the bottom-left corner of the input box to upload reference images. This enriches the input context to achieve more precise output results.
Style Upload
- Position: Top-left corner of the floating input bar
- Function: Upload reference images to specify the generation style
- Action: Upload a style reference file to quickly generate images in the same style. This helps simplify your prompts or eliminates the effort to reverse-engineer specific style prompts.